Posts on theantiquedjourney.com may contain affiliate links. As an Amazon Associate, I earn on qualifying purchases. You can read the full privacy policy and disclosures here.
How To Make a Faux Topiary
By Rachel
|
Share this post. Share the Journey!
Last Updated on December 5, 2025 by Rachel
This tutorial on how to make a faux topiary is super simple and will add a beautiful texture to any room in your home!
With a few materials and some creativity, this just might be your favorite DIY yet. It truly does look like a living plant when you finish it. Follow along and learn how to make a faux topiary!
Can You Tell It’s Faux? Create a Stunning Topiary in Minutes!
Faux plants have come a long way in recent years. However, store-bought fake plants are so crazy expensive! To be more budget-friendly, I’ve come up with a simple DIY to craft your own topiary for under $30.
This faux plant will have others asking “is this real?” Come along on this adventure and learn how to make a faux topiary, that looks real, on the cheap!

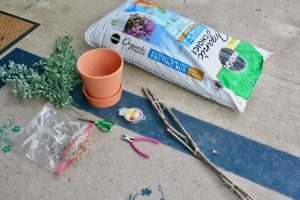
Materials Needed for a DIY Faux Topiary
- potting soil
- 3 medium size branches
- a medium size pot
- floral wire
- faux greenery stems
- floral wire cutter
- hot glue gun
- work surface cover (optional)
- twine
- scissors
How to Make a Faux Topiary- Step by Step Tutorial
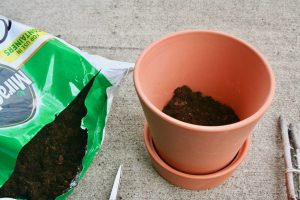
Step 1: Fill your Pot.
Using an old towel or sheet as a work surface cover, if needed, start filling your pot with potting soil. Fill it about half way to start.
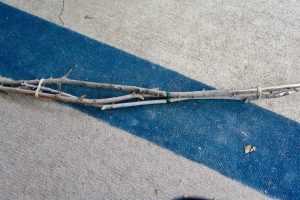
Step 2: Tie the Branches Together.
I went for a walk and gathered medium size branches, similar in length, that had fallen off of trees. You can break off the tops or bottoms of branches to make them a little more even, if needed. Insert a branch into the soil and see how it looks.
Trim the branches accordingly. Cut about a 6 inch piece of twine. While holding all 3 branches together tightly, start wrapping the twine around.
Tip: I wrapped floral wire around the middle part first to secure all the branches together first then went back and wrapped twine around the wire.
When you get near the end of the piece of twine, knot it around itself and tie it off, trimming the excess twine with scissors.
Tip: I found it easiest to start in the middle then wrap the top and bottom.
Wrap them as tightly as you can so they are sturdy and stable! Wrap the top and bottom the same way. You want your DIY faux topiary to be as secure as possible.
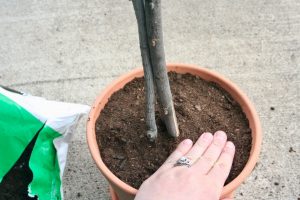
Step 3: Place the Tied Branches Into the Soil.
Push the branches all the way down until they hit the bottom of the pot. Fill the pot the rest of the way with potting soil, keeping one hand on the branches until they are steady and not wobbling around in the pot.
Tip: It is helpful to put a large amount of soil around the base of the branches and pat it down with your hands until the soil is firm.
The branches in my pot were extremely sturdy and not moving around at all once I got all the soil packed in around the base really well.
Step 4: Attach the Faux Stems.
This step requires patience! Using the floral cutters, cut off a small stem from the larger stem. I just picked a spot at the top of the branches and started gluing! There is not any right or wrong way to do this part.
Sometimes I tucked the bottom of the stem into the twine and glued that in, other times I glued the stem right to the branch itself.
Tip: Be sure to hold each stem in place and apply pressure to it for about 30 seconds so they don’t fall off.
After gluing one stem, I stepped back and looked around to see where to glue the next one and just continued that process until it felt complete to me. You may use all of your faux greenery but you may not.

Remember, a topiary is very full at the top, so when you are gluing the pieces on, try and create a ball-like shape that looks lush.
Tip: I ended up wrapping more twine around the branches, about 3/4 of the way under the top twine. I did this to cover up some of the green stems that were poking out from under the other twine and it just made it look a little cleaner.
Step 5: Fluff the Faux Topiary Branches.
With everything in place, step back and look at it your DIY faux topiary. Pull off any glue strings, fluff branches that seem a little flat, or move branches around if needed.
Let it sit and dry for a good 15-20 minutes before moving it.
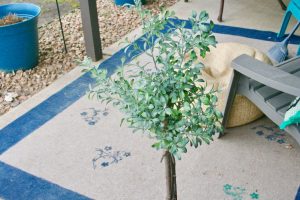
Step 6: Arrange the Faux Topiary in Your Home!
Before picking it up and moving it, have an idea of where you want to put it. Some areas of your home that this topiary would look beautiful include:
- the entryway
- on a front porch
- next to a chair in the living room
- on a fireplace hearth
- in a bedroom

Bring Year-Round Charm to Your Home (Without the Upkeep!)
This topiary project is so simple yet will add such a beautiful, earthy texture to your home. The natural elements of the soil and tree branches helps to ground your space and usher in a calm feeling.
This DIY was inspired by Mary from White Cottage Company. She did something very similar over on her YouTube channel, which I will link here.
Shop Faux Trees

Closing Tidbits on How to Make a Faux Topiary
I hope you found inspiration here today on how to make a faux topiary and are excited to create your own! Let me know in the comments how it turned out for you and where you placed the topiary your home.

Leave me a comment! Do you like using faux plants in your home? I love hearing from you!
Follow Along with The Antiqued Journey
Pinterest | Facebook | Instagram | LTK | Amazon

Just click the red button in the left corner!

If you are new here, I’m Rachel, the writer and content creator here at The Antiqued Journey. I’m so happy to have you! I encourage you to stop by the ‘about me’ page to get to know me a little more.
Here on the blog, you will find loads of inspiration for decorating with vintage and antique decor, simple DIY crafts and many thrifting adventures. If that interests you, I invite you to sign up for my e-mail. You will receive a free digital download as a thank you!
Other DIY Posts to Enjoy


Feeling a little unsure where to start with vintage decor?
I created Found and Favored, a beginner-friendly guide that walks you through what to look for, how to spot quality pieces, and how to style vintage finds with confidence — without overspending or feeling overwhelmed.

Hey! I’m Rachel!
I’m so glad you are here! Old things are my jam. Antique malls and thrift stores are my happy places.
Here on the blog I love to share my excitement, knowledge, and ideas about all things antique, vintage, and thrifted. Let’s journey together!
Want to style vintage decor with confidence?
Get the beginner’s guide that will save you money and help you find real treasures.

Sign me up for the
Journey!
Sign up for free antique and vintage inspiration, DIY projects, and thrifting tips straight to your inbox.
22 Comments. Leave new
Nice and easy
Hola Ian y gracias por las amables palabras sobre el diseño.
Thank you!!
[…] project, this faux topiary is still as beautiful today as the day I created it. This tutorial on how to make a faux topiary is super simple and will add a beautiful, earthy texture to any room in your home! The natural […]
Looks great! I love any and all topiaries and this came out fantastic. XO- MaryJo from Masterpiecesofmylife.com
Hi MaryJo!!
Thank you so much and thanks for stopping by my little corner of the blogging world!! I appreciate your kindness and encouragement!!
[…] How To Make A Faux Topiary […]
[…] How To Make A Faux Topiary […]
This looks so easy to make! And it’s perfect for the spring season!I’m excited to tell you this post will be featured in this week’s Tuesday Turn About Link Party! Thanks for sharing your creativity and we hope to see you at the party this week! Pinned!
Hi Cindy!
Thank you! I appreciate it!!
Rachel! This looks great! Yet another super creative project. Thanks for sharing this project with us who are in foliage starved nordic winter lands.
I LITERALLY laughed out loud when I read this…haahahaha! I don’t know when we’ll see green again but I’m hoping it’s not too far away 🙂 Thanks, friend!
[…] DIY Faux Topiary […]
[…] with greenery in small ways such as displayed in a small vase or pitcher or in large ways like a tree set in a corner. However you decide to use faux plants in your home, they will add beautiful […]
I love quick and easy projects like these, Rachel! Topiaries are one of my favorite things to decorate with and the ways yours came together is fabulous. That little pop of green in your reading nook is so pretty! Hugs, CoCo
Thanks so much, CoCo!!
Rachel! This seems fantastic! Another imaginative concept. We in the leafless winter regions of the North are grateful that you are sharing this initiative with us. Visit My Blog NewsBig.com.pk
[…] DIY Faux Topiary […]
[…] could also use these moss balls to make a faux topiary, place them in a terrarium, or style them into a cloche […]
[…] You can utilize pillar or taper candles, floral arrangements, or more unique textural elements such as tabletop topiary’s. […]
[…] this article, we’ll explore the step-by-step process for making your own topiary, along with some tips and tricks to help you along the way. So, grab your crafting supplies and […]
[…] How to Make a Faux Topiary […]