Posts on theantiquedjourney.com may contain affiliate links. As an Amazon Associate, I earn on qualifying purchases. You can read the full privacy policy and disclosures here.
Vintage Easter Decor: Transforming Ironstone Platters Into Giant Easter Eggs
By Rachel
|
Share this post. Share the Journey!
Last Updated on March 18, 2026 by Rachel
The cutest vintage easter decor I ever did see! I’m transforming thrifted ironstone platters into giant easter eggs using two simple materials.
There’s always the thrill of a good thrift find, right?! And it’s even more fun when you can make something out of that thrifted find! This year, I wanted to craft Easter decor that felt meaningful…something handmade that wasn’t plastic. So, I got to work, pulling thrifted decor out of my cabinet to see what I could use. Then, inspiration struck. I could totally make vintage Easter decor with actual vintage pieces! Want to see the cutest thing ever?! Join me on the blog for transforming ironstone platters into giant easter eggs!
Vintage Easter Decorating
You guys…I say this every time, but this might be my most favorite DIY to date. I cannot believe I hadn’t thought of making these years ago!
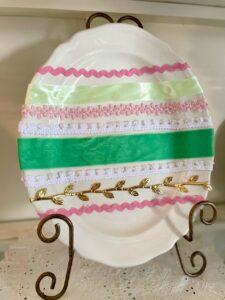
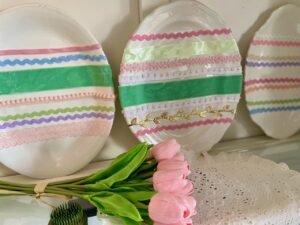
The oval shape of ironstone platters perfectly mimics an egg, making them the ideal canvas for vintage easter decor.
I had so much fun crafting these giant Easter ‘eggs’! With just a couple of inexpensive materials, a stack of platters and a few hours, I had made the cutest set of Easter eggs to use in any space. This just goes to show you that you can turn a plain ol’ platter, or any other everyday item, into something ‘egg-stra’ special 🙂
Join me below for the full tutorial!

Key Points
Vintage ironstone platters make stunning oversized “Easter eggs” when stood upright and styled together. Their oval shape, creamy white finish, and antique charm make them a natural fit for elegant, budget-friendly Easter vignettes. Look for them at thrift stores and antique malls, then group varying sizes for a layered, collected-over-time look.
Why Ironstone is Perfect for Easter DIY Projects
Ironstone, even though made out of heavy ceramic, is visually light, bright and airy for the new season. With it’s creamy white aesthetic and crazed patina, the vibe of ironstone is perfectly suited for spring, and especially for Easter. Ironstone is practical yet exudes a cottage-garden look…Peter Rabbit-esque if you will.
Not only that, but utilizing secondhand or vintage items for crafting is a huge highlight for me! The sustainability of using thrifted items for seasonal decorating is truly something that brings me such joy.
In my book, there is no need to buy new, ever!
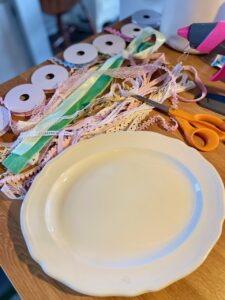
Supplies You’ll Need for DIY Ironstone Easter Eggs
- a stack of ironstone platters (varying sizes)
- various widths and colors/ textures of ribbon (satin, lace, ric rac, old trim remnants, etc…)
- low temp hot glue gun (low temp is safer for vintage glazes)
- scissors
Shop Ironstone Platters

Vintage Easter Decor: Transforming Ironstone Platters Into Giant Easter Eggs
With that, let’s get into the fun craft! Below are the steps that I used to create my ‘eggs’. As always, this is meant to be a guide. Take what suits you and feel free to modify or tweak as you see fit.
Step-by-Step: Turning Platters Into Ribbon-Wrapped Eggs
Step 1: Prep Your Platters.
I chose a stack of three thrifted ironstone platters to use for the project. To make sure the glue adhered correctly, I lightly cleaned each one with damp rag and mild soap then used a clean towel to dry.
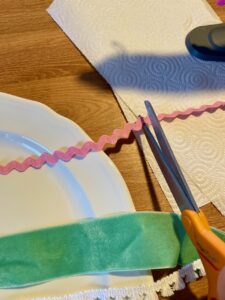
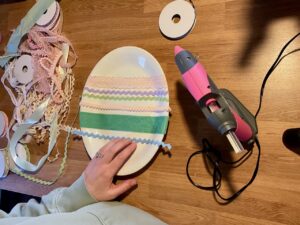
Step 2: Planning the ‘Egg’ Pattern.
First of all, if you don’t have any ribbon around the house to use, check your local thrift store before going to the craft store! I’ve seen SO many kinds of ribbon for just a dollar per roll.
Next, you’ll want somewhat of a plan for how each ‘egg’ will look, like which ribbon type you want to use and where. What I’m saying is that you don’t want to haphazardly glue ribbon before briefly thinking it through first!
The best way to go about this is by mixing and matching ribbon widths, and colors, to mimic traditional hand-painted egg stripes.
I laid ribbon strips down on the platter to get a rough outline of the egg pattern. As you go along, this can be switched or changed but it’s just nice to have somewhat of a plan before continuing.

Step 3: Cut the Ends.
After the ribbons were laid out, I then cut the ends. This makes it easier to glue rather than having a long roll of ribbon to contend with.
Keep a little bit of overlap on each ribbon piece for wrapping around the backside.
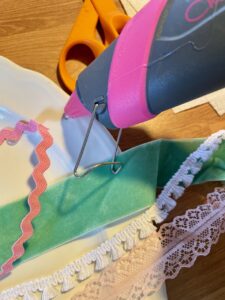
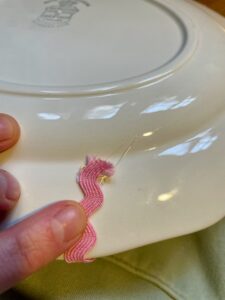
Step 4: The ‘No Damage’ Gluing
To adhere the ribbon so that it’s secure yet easily removable after the holiday, hot glue is the way to go!
I used small dots of hot glue, about 4-5 dots per ribbon strip.
(Then, once Easter is over, simply pull the ribbon and hot glue bits off! No damage at all.)
Step 5: Secure the Ends.
When I got to the end of a ribbon strip, I tucked the ribbon neatly around the back of the platter and secured with a small dab of hot glue.
Step 6: Continue the Process.
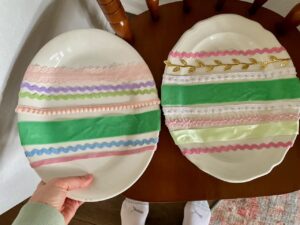
I followed the same process for all of my ‘eggs’. It’s up to you how many platters you want to use, but I opted for three so that I had enough for decor and/or styling.
The three platters combined took me about two hours to complete.
Tip: It’s totally okay, and I actually prefer it, for each ‘egg’ to not match. Use different ribbon, vary the spacing, mix up the colors used, etc…That’s what gives each one unique character!
Step 6: Cleaning Up.
Once finished, I took a few minutes to pull off glue strings and any ribbon fray that might have occurred.
And, voila! Done.
Styling Your Vintage Easter Display
So cute, right?! I told you! And such a pleasure to make.
This final step is the most fun…displaying your handmade Easter decor!
Here are some ideas for:
- line them up against the back of a hutch
- hang on the front door
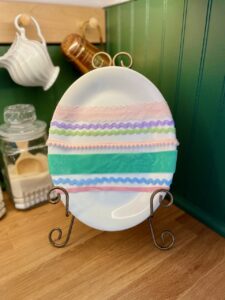
- prop them up on plate stands
- use them for a centerpiece
- hang the grouping on a wall using plate hangers
You can also opt to add ‘supporting characters’ like moss, bird’s nests, or flowers to complete the look.
Here in the hutch, I placed a bunch of pink Tulips, a flower frog and a linen slightly off to the side to bring a Spring-like atmosphere to the vignette!
Closing Tidbits on Vintage Easter Decor: Transforming Ironstone Platters Into Giant Easter Eggs
I mean…seriously adorable. I had so much fun putting this vintage Easter decor together and was so excited to show them to you! Transforming my thrifted ironstone platters into ‘eggs’ is a project that will go down as an all-time fav.
I hope this inspires you to look at your thrifted stacks, and stashes, with new eyes to see what you can craft!
Be encouraged to create something using what you already have, finding joy along the way.

Leave me a comment! What are you crafting for Easter this year? I love hearing from you!
Follow Along with The Antiqued Journey
Pinterest | Facebook | Instagram | LTK | Amazon | Lowe’s
 PIN it to save for later!

If you are new here, I’m Rachel, the writer and content creator here at The Antiqued Journey. I’m so happy to have you! I encourage you to stop by the ‘about me’ page to get to know me a little more.
Here on the blog, you will find loads of inspiration for decorating with vintage and antique decor, simple DIY crafts and many thrifting adventures. If that interests you, I invite you to sign up for my e-mail. You will receive a free digital download as a thank you!
Other Posts to Enjoy
Thrift Your Way to a Vintage Ironstone China Collection

DIY Easter Tree with a Vintage Tin

Feeling a little unsure where to start with vintage decor?
I created Found and Favored, a beginner-friendly guide that walks you through what to look for, how to spot quality pieces, and how to style vintage finds with confidence — without overspending or feeling overwhelmed.

Hey! I’m Rachel!
I’m so glad you are here! Old things are my jam. Antique malls and thrift stores are my happy places.
Here on the blog I love to share my excitement, knowledge, and ideas about all things antique, vintage, and thrifted. Let’s journey together!
Want to style vintage decor with confidence?
Get the beginner’s guide that will save you money and help you find real treasures.

Sign me up for the
Journey!
Sign up for free antique and vintage inspiration, DIY projects, and thrifting tips straight to your inbox.
4 Comments. Leave new
Oh my goodness, Rachel, this is such a creative and adorable idea! The eggs turned out super cute, and I love how budget-friendly it is! Pinning this now so I can try it sometime!
Thanks so much, Donna! This was such a fun one!!
What a great idea! This looks adorable, and the best part is, you can remove the ribbons and use the platters. I will pass this along to my daughter-in-law.
Hi!
Thanks so much!