Posts on theantiquedjourney.com may contain affiliate links. As an Amazon Associate, I earn on qualifying purchases. You can read the full privacy policy and disclosures here.
How to Make a Gallery Wall for Your Living Room: A Step-by-Step Guide to Styling Thrifted Art
By Rachel
|
Share this post. Share the Journey!
Big impact decor with little effort. Learn how to make a gallery wall using thrifted art for your living room in this step-by-step guide!
Ah gallery walls. We all know ’em, love ’em and can see why they are so popular. Yet, why is it that they feel so overwhelming to attempt?! For me, I think it’s because I’m always shown these huge walls with like fifty pieces on them. My brain can’t compute all that. So, I’m here to show you that you don’t need a massive wall with a million decor items to make a giant statement! I took just seven art pieces from my thrifted art collection and turned them into a beautiful display. Come along as I share how to make a gallery wall for your living room with this step by step guide to styling thrifted art!
Why a Gallery Wall for the Living Room is the Perfect Weekend Project
Hi, I’m Rachel and I can’t stop buying pretty vintage art 🙂
Yes, when I’m out thrifting, I’m always looking for more vintage art to add to my collection. Because, well, you can never have too many pictures! Besides, there is so much beauty in found items from thrift shops versus retail stores…the old ones contain so much more character and personality, not to mention how inexpensive they are!
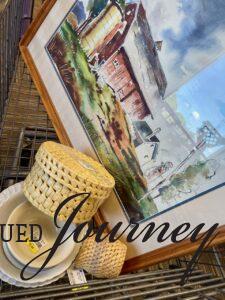
Let’s start this post off by allowing you into my closet where I keep my stash of thrifted art. This is where all my art is kept; safe behind my dresses, free from sun light and water.

The concept of a gallery wall for the living room is obviously not new to any of us but I want to show you how it can be done as a way to add personality and history to a home instead of just because it’s a ‘home trend’. And, you don’t have to do this all on a giant scale, either. Gallery walls can get VERY expensive when done the ‘traditional’ way, but here at The Antiqued Journey, I am anything but traditional.
Through the use of inexpensive art from the thrift store and using what you already have, a gallery wall can be done on a much smaller scale and on a much smaller budget.
So, if you’ve been wanting to try a gallery wall in your home but have felt intimidated, be intimidated no more! This is your time to shine, girl! I did this all in a span of a few hours on a Saturday afternoon and you can, too.

Sourcing Unique Gallery Wall Art at Thrift Stores
To build a gallery wall, you will first need to source art. But, how, and where, to look for cheap art? I have a few suggestions up my sleeve!
- Look for art at estate sales, thrift stores, flea markets, and antique malls. You can totally find art for under $20 at any of those places…you just need to dig! (BTW…my top price to pay for vintage art is $25, so just keep that in the back of your mind! If you need any more tips on sourcing vintage art, you can check out my e-book, Found and Favored!)
- To make a gallery wall feel cohesive, I suggest choosing a specific color palette or theme, such as landscapes, sketches, or botanicals. You can absolutely mix the themes together, but just try and keep the color ways similar.
- Pro Tip: Look at the art, not the frame (or vice versa)! If the frame is beautiful but the art not so much, get the frame and put different art in it. And, if the art is amazing but the frame is ugly, you can always paint the frame or use gold rub ‘n buff to transform it. Voila…no problem!
The Best Ideas for Gallery Wall Displays
In my case, I didn’t have the space (nor the mental capacity) to create a giant display. So, I chose seven of my favorite thrifted art pieces that weren’t being used at the time, to style on the wall behind my couch.
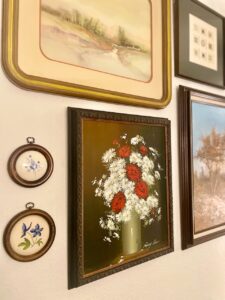
Here, it’s apparent just how much more quality can be seen in vintage artwork over new art from retail stores. If you are doing a small-scale gallery wall like me, I highly suggest curating vintage and thrifted art. The older pieces bring so much more character and meaning into your space!
The Power of Less
I live by the saying ‘less is more’ and that holds true for any space in a home. You can totally use less on a gallery wall and it will come out looking just as, if not even more beautiful, than using more. A smaller collection of, say, 6-10 pieces, feels intentional and manageable.
Mix Media
You can totally use different textures and items besides art!
Think:
- oil paintings
- glass-covered prints
- mirrors
- vintage plates or platters
- tapestries or wall hangings
- even small 3D objects such as a wooden birds, gold butterflies, brass sconces, or flat baskets
All will work to create a stylish and personable gallery wall!
Vary Shapes and Sizes
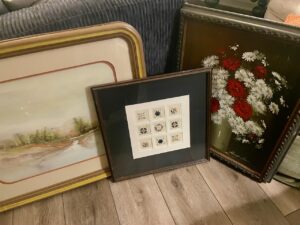
When choosing pieces to use in your gallery wall, it’s important to vary the shapes and sizes of art and other objects. This helps to create dimension and interest amongst the display as a whole.
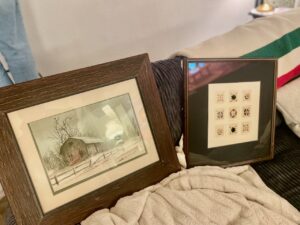
On my gallery wall, I utilized square, rectangular, and circular art in mediums such as oil, watercolor, and needlepoint. I also used frames of all different kinds-frames with rounded edges, ornate frames, and plain wooden frames.
Shop the Curated Wall Look

How to Make a Gallery Wall for Your Living Room: A Step-by-Step Guide to Styling Thrifted Art
Okay! With all that out of the way, let’s chat about how to actually do the thing…ya know…like hanging the art and whatnot. The great news is that it’s way easier than I thought it would be!
Tools of the Trade
Yes, I used just four tools to put my gallery wall together!
(Side note: If you don’t want to purchase a picture hanging kit, you can simply use nails, but I find that the kit has everything you need like different sized nails and hooks, wire, etc…)
- hammer
- picture hanging kit
- level
- pencil
Planning Your Gallery Wall Layout
Now for the most important part of the whole process…laying out the design of the gallery wall! I spent the most time on this step because I wanted to really make sure it looked pleasing and proportionate.
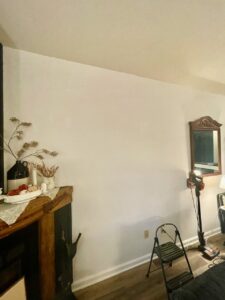
For reference, here’s what I started with and what the wall looked like before. A blank, bare canvas, just waiting to be transformed!
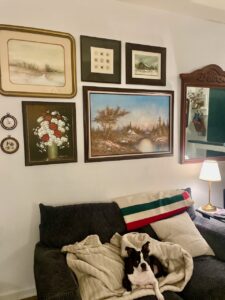
By the way, I should mention that the large mirror always lives in this spot…I thrifted it years ago and it bounces so much light from other areas of the house. It kinda just became a part of the gallery wall, unintentionally, but I totally love it!
1. Lay Out Pieces on the Floor
To help my brain visualize the gallery wall layout, I briefly laid most of the art pieces on the floor (and couch) before hanging them.
I put them one way, looked at it, moved a few around, and looked at it again. This is the best time to play around with the look before putting a million holes in the wall!
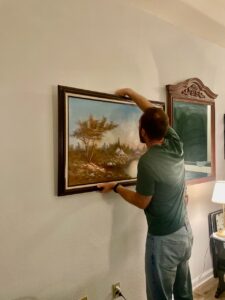
2. Hang the Anchor Piece
Generally, the center of a gallery wall should sit about 57-60 inches from the floor. Take this with a grain of salt because you have to take into account any furniture that goes along that wall and such.
With that in mind, I started by hanging the largest piece of art first. This acts as the ‘anchor piece’ for the rest of the display. We measured about where it needed to hang, marked the spot with a pencil, and used a picture hook to hang it.
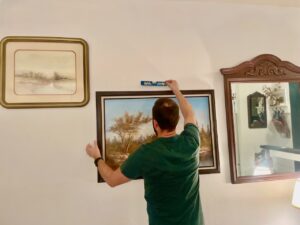
From there, we hung the second largest piece, adjacent to the first.
After each one, we made sure to use a level to make sure they were straight.
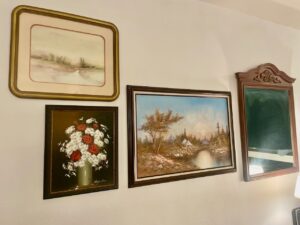
3. Continue the Process
I continued this process until all of my pieces were used up. The act of repeatedly hammering and hanging art was actually super soothing…you just get into a nice rhythm, you know?!
A Pro Tip on Balance and Spacing: Keep 2–3 inches between frames (or items) for a tight, professional look.
Styling Your Gallery Wall Decor for Maximum Impact
As I neared the completion of the gallery wall, I wanted to be sure that each piece of wall decor made sense not only within the display itself, but with the rest of the living room, as well.
Before finishing, I stepped way back and just took it all in. Here are some questions I asked myself:
- “Does the art reflect how I want this space to feel?”
- “Is the art on the wall compatible with the rest of the room?”
- “Does anything look out of place or is something missing?”
After some reflection, to me, it all felt very correct. I was super happy!
Other Decor Elements to Keep in Mind
Lighting: I found it helpful to have a light source nearby-either a picture light, table lamp, or floor lamp- to help elevate the gallery wall decor.
Furniture Connection: This might sound funny, but the art should “talk” to the sofa or sideboard beneath it as if they are friends. I left a decent sized gap between the row of art and the couch itself so that nothing got bumped, but do you notice how the art ‘connects’ with the couch below?
Keeping everything harmonious will go a long way in achieving the curated, vintage aesthetic that we all love!
Gallery Wall Pictures for Your Inspiration
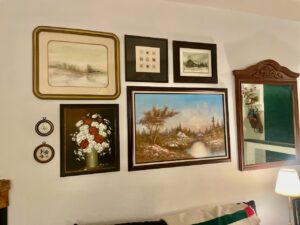
So, after all was said and done, here is my thrifted transformation! I’m an old soul and this gallery wall, full of found vintage pieces, makes my heart extremely content.
I want to reiterate that gallery walls don’t have to be expensive, or expansive, to be beautiful. Over the years, I’ve either been gifted the art used or thrifted it myself, coming in at around $30 total for the art. That’s SO crazy good!
So, this just goes to show that you can totally make this happen on a very tight budget. It may take some time to source the art or items needed but that’s the fun of it, right? Good things take time and patience is always key, especially when thrifting.
Closing Tidbits on How to Make a Gallery Wall for Your Living Room: A Step-by-Step Guide to Styling Thrifted Art
If you’ve been on the fence about making a gallery wall for your home, I hope this gives you a ‘go ahead and do it’ attitude. There’s truly nothing to lose!
There is such joy in thrifting…sourcing art with your own two hands and then bringing it home is extremely special. I can’t think of anything better than combining a DIY gallery wall with art that you took the time to find.
Be encouraged to be bold and brave, finding a resilient spirit along the way.

Leave me a comment! Have you ever made a gallery wall? How did it go for you and what did you use? I love hearing from you!
Follow Along with The Antiqued Journey
Pinterest | Facebook | Instagram | LTK | Amazon | Lowe’s

PIN it to save for later!
If you are new here, I’m Rachel, the writer and content creator here at The Antiqued Journey. I’m so happy to have you! I encourage you to stop by the ‘about me’ page to get to know me a little more.
Here on the blog, you will find loads of inspiration for decorating with vintage and antique decor, simple DIY crafts and many thrifting adventures. If that interests you, I invite you to sign up for my e-mail. You will receive a free digital download as a thank you!
Shop My Favorite Thrift Shopping Essentials
Other Posts to Enjoy
How to Refresh a Kitchen Without Renovating

Living Room Decor with Vintage Milk Glass

Your Ultimate Guide to Thrifting

Feeling a little unsure where to start with vintage decor?
I created Found and Favored, a beginner-friendly guide that walks you through what to look for, how to spot quality pieces, and how to style vintage finds with confidence — without overspending or feeling overwhelmed.

Hey! I’m Rachel!
I’m so glad you are here! Old things are my jam. Antique malls and thrift stores are my happy places.
Here on the blog I love to share my excitement, knowledge, and ideas about all things antique, vintage, and thrifted. Let’s journey together!
Want to style vintage decor with confidence?
Get the beginner’s guide that will save you money and help you find real treasures.

Sign me up for the
Journey!
Sign up for free antique and vintage inspiration, DIY projects, and thrifting tips straight to your inbox.
4 Comments. Leave new
Your gallery wall looks great Rachel. I love gallery walls and I love that you created this with thrifted finds. Amazing! XO- MaryJo
Thank you!!
Thanks for sharing your tips on putting together a gallery wall! This is an inexpensive way to make a big statement in your home, and it’s such a great way to showcase your art collection!
Hi! Of course! I love how it turned out:)