Posts on theantiquedjourney.com may contain affiliate links. As an Amazon Associate, I earn on qualifying purchases. You can read the full privacy policy and disclosures here.
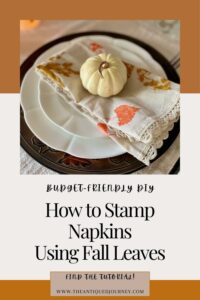
From Tree to Table: DIY Leaf-Printed Napkins for Fall Decor
By Rachel
|
Share this post. Share the Journey!
Last Updated on October 31, 2025 by Rachel
Bring a touch of the outdoors to your table this season. Learn how to up-cycle fabric napkins using stamped leaves for budget-friendly DIY fall decor that will wow guests!
Autumn is the season of change where the trees shed their vibrant leaves and the air turns crisp. And, did you know that these fallen leaves can be used to create unique pieces of home decor? It’s true! With a little creativity and some simple DIY techniques, you can craft your very own leaf-printed napkins for simple fall decor. It’s easy…I’ll show you how!
Napkins with Nature’s Charm for Fall Decorating: A Simple Leaf-Stamping DIY
Not only will this autumn craft add a touch of nature to your table setting but it’s also an environmentally friendly way to spruce up your home for the season.

In this post, we’ll dive into the process of turning a simple leaf into a stamp to create stunning napkins. I’ll provide you with all the tips and tricks you need to create your own set. Get ready to take a journey from tree to table and learn how to make DIY leaf-printed fall napkins!
Materials Needed for DIY Leaf Fall Napkins
*I’ve linked everything I could for you in the list below*
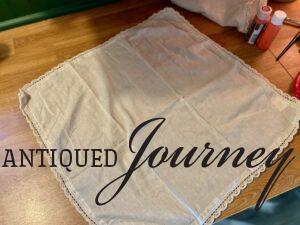
- set of 4 fabric napkins
- fallen leaves ( If leaves don’t fall where you live, you can use these rubber stamps)
- fabric paint ( I used dark orange, yellow ochre, and autumnal copper)
- foam dobbers
- paper plate
- cardboard or scrap paper
Shop Neutral Napkins

From Tree to Table: DIY Leaf-Printed Napkins for Fall Decor Tutorial
Hell, guys! Welcome back to the blog!
I have the cutest fall DIY project to share with you today using free materials from nature! I mean…who doesn’t love free?! To make the most out of the natural materials that Mother Nature gifts us this time of year, I decided to take a walk and pick up as many pretty fall leaves as I could find.
The end result turned out so beautifully…I can’t wait for you to see it. This project is super simple, perfect for kids and adults alike. Let’s get right into it!
1. Choosing the Perfect Fall Leaves.
The first step is to, obviously, forage for fallen leaves.
For the sake and ease of this project, you want the leaves to be freshly fallen, not crunchy and brown. It’s also important that there be some variety amongst your leaf patterns so finding a handful of leaves from 3-4 different tree species is ideal.
I picked up a variety of leaves including maple, poplar, and ash.
Tip: If you don’t have fallen leaves in your area, you could opt to use rubber stamps, instead.

2. Fabric Napkin Prepping Tips
Next, you will want to prep your napkin(s) for painting.
Place either a piece of cardboard, newspaper, or scrap paper on the surface you will be working on. This will ensure that any bleed-through from the paint will go onto that instead of the countertop or whatever.
3. Choosing Paint Colors
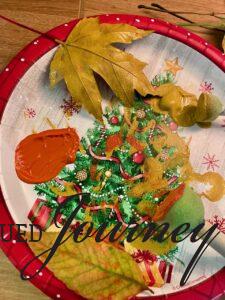
Since this is a fall craft, I went with colors in the autumn color way. I chose three different fabric paints that best corresponded with my table decor.
Then, I squeezed a small amount of each paint color onto a paper plate.
4. Prepare Leaves for Stamping
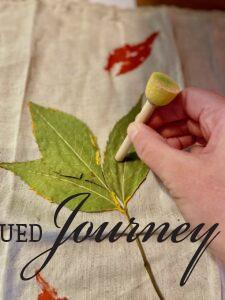
For the application of paint, I found that foam dobbers worked best. They are squishy and soft enough that they won’t tear the leaves while applying the paint.
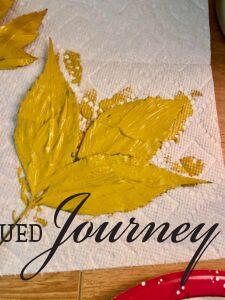
Next, choose which leaf you want to start with. I decided to start with a larger leaf, so here you see an ash leaf stem with multiple leaves attached.
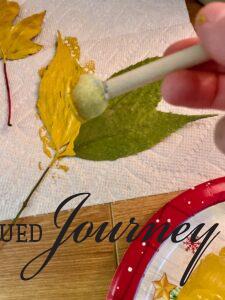
To get the best paint coverage onto the napkin, I found that applying a generous amount of paint onto the leaf is the ticket.
So, using a foam dobber, coat the leaf with paint until it’s completely covered.
Tip: For an extra realistic look, dob some paint onto the upper part of the stem, too!
5. Stamp Leaves onto Napkin.
Now comes the fun part!
Once you have the leaf prepped with paint, pick a spot on the napkin that you want to stamp.
Then, turn the leaf over. To help adhere to paint to the napkin, I used the wooden dowel end of the foam dobber to firmly press each side of the leaf.
Once you have the leaf firmly pressed down, pull it off the napkin using the stem.
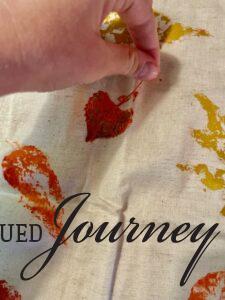
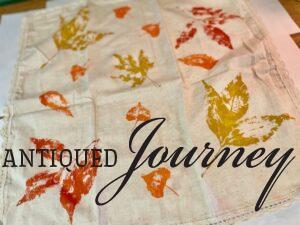
Voila! Your napkin may look something like this after a few leaf stamps.
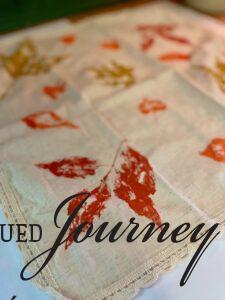
6. Continue the Stamping Magic
Continue to use the steps above to complete all of the napkins. I suggest stamping a set of four so that you have enough to host a small dinner party.
Here are some stamping techniques that I recommend for flawless leaf printed napkins:
- Alternate where you are stamping each leaf. It’s more visually appealing when two of the same leaves are not right next to each other.
- Don’t crowd the leaves. Make sure you are leaving enough space between each leaf stamp.
- For a pleasing look, I would recommend no more than 14 stamped leaves per napkin.
- Vary the colors you are using on each leaf.
- Spread out the paint colors evenly so that the napkin feels cohesive!
- Vary the sizes of leaves. If you stamp two larger leaves, my tip is to stamp a few smaller leaves in between.
7. Let the Paint Dry.
Once you have completed all of your napkins, I recommend letting the paint dry for 24 hours.
I found it helpful to hang my napkins over the side of the bathtub and shower curtain rod.
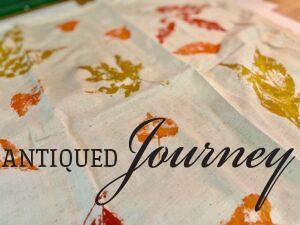
Level Up Your Table Setting: DIY Fall Decor Napkins with Stamped Leaves
The next day, once my napkins were completely dry, I set a very simple fall tablescape using items I had on hand such as:
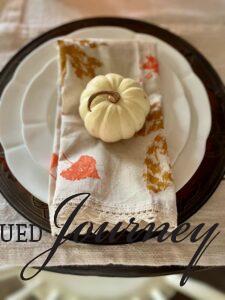
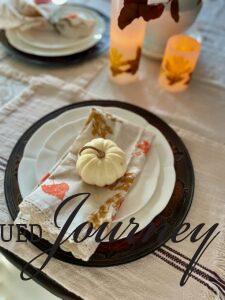
The handmade leaf napkins add such a whimsical touch to the table. How perfect to use for a fall party or Thanksgiving!
How to Arrange a Cloth Napkin on a Table
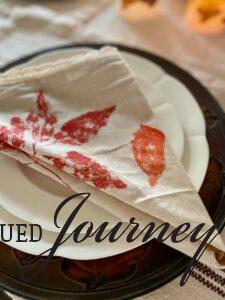
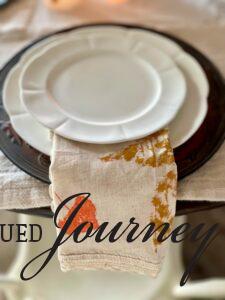
When styling my table, I played around with different ways of arranging the stamped leaf napkins.
First, I tried it with a copper leaf napkin ring.

Then, I folded the napkin into a triangle.
I also tried tucking the napkin underneath a salad plate.
Ultimately, I settled on folding the napkin into a rectangle and placing a small white pumpkin on top of it.
Which way is your favorite?!

Common Questions About Leaf Stamped Napkins for DIY Fall Decor:
1. What type of fabric napkins are best for this project?
Any kind of linen or cotton napkin, or a mix of the two, are what I found to work best.
2. What kind of paint should be used for stamping on fabric?
Acrylic craft paint or any type of craft paint that is specific to fabric. For clarification, read the paint bottle for what types of surfaces it can adhere to.
3. How do I prepare the leaves for stamping?
Honestly, I didn’t do anything to my leaves! I simply picked them up off the ground and brought them inside.
Though, it would be wise to be sure your leaves don’t have any bugs or excessive dirt on them. If the leaves you are using are particularly dirty, a damp rag or paper towel will clean them right up.
4. Can I use other natural objects besides leaves?
I’m sure that could totally be done! Any flat object found in nature and that can be painted may work. I’ve never tried it but I’m sure you could use materials such as small pinecones, berry stems, pine bows, small twigs, and the like.
6. How do I set the paint so it doesn’t wash off?
To set fabric paint, you have two options. Each one requires a bit of care and caution, so please do so.
- Iron. Set your iron to the hottest setting. Place a clean, dry cloth over the design and iron for 3-4 minutes. You could also iron from the backside of the napkin for 5 minutes. Just be sure to keep the iron moving at all times to avoid scorching.
- Clothes Dryer. Using the hottest setting on your dryer, put the napkins in the dryer for 60-90 minutes.
7. Can I use pre-made fabric stamps instead of leaves?
Yes! You can absolutely use pre-made or rubber stamps instead of leaves. Alternately, you can trace a leaf template onto a napkin and then paint inside the lines.
8. What are some ideas for customizing the stamped napkins?
For additional customization, you could outline your leaf prints with glitter, use different paint colors, or paint polka dots or other details amongst the leaves. You could even customize each napkin the with name of the guest that is going to be using it, which can then double as a place setting!
9. How do I care for my DIY leaf-stamped napkins?
I recommend either hand-washing the napkins or washing them inside of a garment bag in your washing machine using the gentle cycle.
Closing Tidbits on From Tree to Table: DIY Leaf-Printed Napkins for Fall Decor
Creating your own leaf printed fall napkins is a simple yet satisfying way to add a touch of nature to your dining table. By following a few easy steps and using materials readily available in your backyard, you can transform plain napkins into unique pieces of art! This project also adds a personal and eco-friendly touch to your home decor.
As you gather around the table with your loved ones this season, be encouraged to let these napkins be a reminder to slow down and appreciate the beauty in the little, everyday things.

Leave me a comment! What leaves would you use on your napkins? I love hearing from you!
Follow Along with The Antiqued Journey
Pinterest | Facebook | Instagram | LTK | Amazon
 Click the red button to save it for later!
If you are new here, I’m Rachel, the writer and content creator here at The Antiqued Journey. I’m so happy to have you! I encourage you to stop by the ‘about me’ page to get to know me a little more.
Here on the blog, you will find loads of inspiration for decorating with vintage and antique decor, simple DIY crafts and many thrifting adventures. If that interests you, I invite you to sign up for my e-mail. You will receive a free digital download as a thank you!
Shop my Favorite Thrifting Supplies
Other Posts to Enjoy

Thanksgiving Centerpiece with a Vintage Crate


Feeling a little unsure where to start with vintage decor?
I created Found and Favored, a beginner-friendly guide that walks you through what to look for, how to spot quality pieces, and how to style vintage finds with confidence — without overspending or feeling overwhelmed.

Hey! I’m Rachel!
I’m so glad you are here! Old things are my jam. Antique malls and thrift stores are my happy places.
Here on the blog I love to share my excitement, knowledge, and ideas about all things antique, vintage, and thrifted. Let’s journey together!
Want to style vintage decor with confidence?
Get the beginner’s guide that will save you money and help you find real treasures.

Sign me up for the
Journey!
Sign up for free antique and vintage inspiration, DIY projects, and thrifting tips straight to your inbox.
7 Comments. Leave new
[…] past Thursday, I shared a brand new DIY post on how to make stamped leaf napkins! This project is fun for all ages and will for sure add a special, homemade touch to your fall […]
Your napkins turned out beautifully, Rachel! What a fun project. They would look so beautiful on my Thanksgiving table. I may have to give this a try. Thank you for sharing!
Thanks, Jen! Appreciate it!!
Your napkins are lovely, I adore the lace trim! Such a great idea to use leaves from the yard making this super budget-friendly! Pinning now so I can try this sometime!
Thanks, Donna!! It was a super fun project!
[…] Leaf Stamped Fall Napkins […]
[…] DIY Leaf Printed Fall Napkins […]