Posts on theantiquedjourney.com may contain affiliate links. As an Amazon Associate, I earn on qualifying purchases. You can read the full privacy policy and disclosures here.
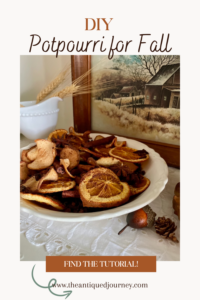
How to Make Fall Potpourri with Dried Fruit
By Rachel
|
Share this post. Share the Journey!
Last Updated on December 4, 2025 by Rachel
Come see how to make fall potpourri with dried fruit and fill your home with warm and cozy scents!
As the leaves begin to change and the air turns crisp, it’s the perfect time to bring the smells of autumn into your home. What better way to do that than with a homemade potpourri? Imagine the comforting aromas of cinnamon, cloves, apples, and dried orange slices filling every corner of your space. Join me as I show you how to make fall potpourri with dried fruit!
Sweet and Spicy Homemade Potpourri for Fall
Not only will homemade potpourri add a festive touch to your decor but it also makes for a thoughtful and unique gift.
In this article, I’ll guide you through the simple steps of creating your own fall potpourri using readily available fruit. Get your senses ready as we explore the creative art of making fall potpourri!

Fall Potpourri Recipe
- 2 apples
- 1 orange
- 1 pear
- 5 cinnamon sticks
- star anise (desired amount)
- whole cloves (desired amount)
- 15-20 drops of cassia essential oil
- 5-10 drops of orange essential oil
- 1 Tbsp. ground cinnamon
- 1 Tbsp. ground nutmeg
Materials Needed for Homemade Fall Potpourri
- 1 large cookie sheet
- parchment paper
- a knife and cutting board
- an oven
- tongs
- large Ziploc bag
- Tablespoon
Fall Potpourri with Dried Fruit Recipe
Prep Time: 30 Minutes Baking Time: ~ 4 hours/ tray
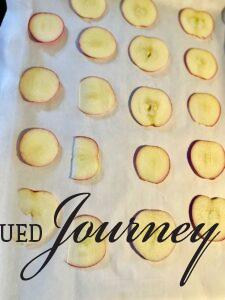
- Heat oven to 200 degrees. Thinly slice apples, orange, and pear.
- Lay a sheet of parchment paper on a cookie sheet, then place fruit, spaced evenly apart, on tray.
- Bake for 30 minutes, then flip all fruit, bake for another 30 minutes, etc…It will take approx. 4 hours to fully dry the fruit.
- After fruit is completely cooled, put all slices in a large Ziploc bag. Add remaining ingredients to bag with the oils being last. Finally, shake or move the bag gently to incorporate the oils.
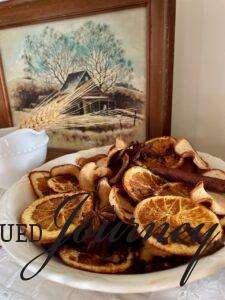
- Display in a bowl or vase!
Shop Potpourri Supplies

FAQ’S on DIY Fall Potpourri
What are the best ingredients for dry potpourri?
It’s really up to you! But, for fall, think warm, spicy, and cozy. Fruits like apples, oranges, and pears are great options and, for accents, try cinnamon sticks, star anise, cloves, and bay leaves.
How long does dried fruit potpourri last?
If the fruit is dried properly, it can last 3-6 months. If it gets moldy, you will need to throw it away. But, if it’s just that the scent went away, you can always add 5-6 more drops of oil to the potpourri mix to bring it back to life!
How to Make Fall Potpourri with Dried Fruit Tutorial
Hello, guys! Are you ready for a super cool fall DIY project?! I’m really excited to share this one with you today.
The following DIY potpourri recipe and coordinating tutorial is meant to be a guide. I tweaked the original recipe as I went along to fit my needs so feel free to do the same.
This is truly the most amazing smelling potpourri I’ve ever had the pleasure of smelling. So, if you’re ready, let’s get into it!
1. Prepare Baking Tray.
First, pre-heat your oven to 200 degrees Fahrenheit.
Then, place a large sheet of parchment paper on a baking tray.

2. Cut Fruit into Thin Slices.
The first step in making potpourri is preparing the fruit.
I started with the apples. You want to cut them into very thin slices so that they dry properly.
I used two full apples for my potpourri but you could opt to use just one.

After the apples were cut, I placed them on the baking tray. Be sure to space them out evenly on the tray so that they dry on all sides.
Tip: As you can see, some of the apple slices fell apart or didn’t cut all the way through. But, instead of throwing those slices away, use them! They look rustic and natural.
I repeated this same process for the orange and pear.
3. Bake Fruit Slices.
Place the tray of fruit in the middle of the oven.
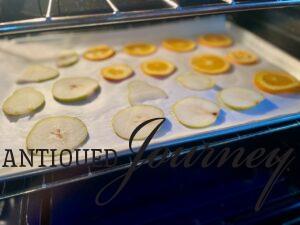
You are going to need to flip the fruit slices every half hour. So, set a timer for 30 minutes or, if you’re like me, I just remembered what time it was when I flipped the fruit last and kept time accordingly.
Here are the apples after a few flips.
My tray of apples took about 4 hours to fully dry. I dried the orange and pear slices on a separate day, which also took 4 hours. Depending on your oven, it may take your fruit less time or more time.
*I will let you know that I dried the apples on one day and then dried the tray of orange and pear slices the next day. So, after it was all said and done, the three fruit varieties took 8 total hours of drying. I recommend only putting one cookie sheet in at a time so that the heat is evenly distributed amongst the fruit slices.*
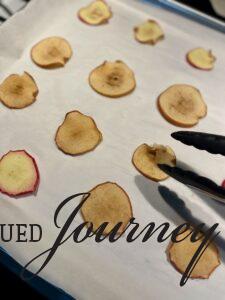
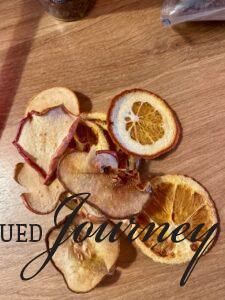
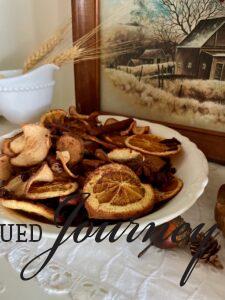
You will know your fruit is done when it looks something like this: curled up on the sides, has shrunk drastically, is dark in color, and is a tad crispy to the touch.

4. Let Fruit Cool.
Before continuing, you will want to let the fruit cool completely. What worked for me is, after taking the cookie sheet out of the oven, I set it on top of the stove and just let the fruit sit for about 45 minutes.
This not only cools the fruit but also helps whatever sticky residue left on any of the fruit to completely air dry.
Here is what my fruit slices looked like when fully dry and cooled!
5. Mix the Potpourri Together.
To mix everything together, start by placing all fruit in a large Ziploc bag.
Add 5 cinnamon sticks.
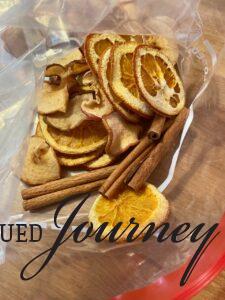
Then, add whole cloves and star anise. I don’t have an actual amount for this step…I used the amount that felt right to me. So, it’s totally up to you and how strong or muted you want those particular scents.
Once you add those items, measure out one Tablespoon each of ground cinnamon and ground nutmeg.
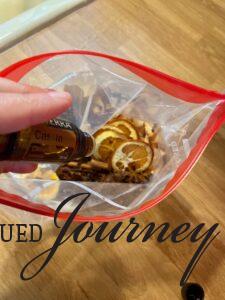
Finally, add the essential oil. Again, the amount of oil used depends on how strong you would like your potpourri to smell.
I added a good amount of Cassia oil, roughly around 15 drops. Then, to make the potpourri slightly sweeter smelling, I dropped in about 5 drops of orange oil.
Gently shake or move the potpourri around with your hands to coat all of the ingredients with oil.
How to Use Potpourri for Fall Decor
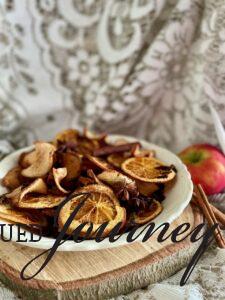
And, with that, we have finished homemade fall potpourri! See how easy that is?!
You guys…it smells SO good. As I’m sitting at my desk, I can smell the potpourri wafting down the hallway from the bathroom where it’s sitting on the counter.
And, now that you have this amazing handmade fall scent, you might be wondering, “How do I display it?” or “Where can I use this?”
Both are great questions!
For vintage fall potpourri vessels, try any of the following:
- ironstone bowl or tureen
- shallow ceramic tray or platter
- in a thrifted glass vase
- milk glass compote
- copper bowl
Shop Ironstone Bowls
To decorate with potpourri for fall, try these options:
- place on a bathroom or kitchen counter
- set on an entryway table or credenza
- style into a hutch or shelf vignette
- tie a ribbon around a vase filled with it

To give DIY potpourri as a gift, some ideas include:
- thrifting a glass jar with a lid or closing clasp. Place potpourri in the jar and tie a ribbon around the neck.
- line a tightly woven, lidded basket with fabric or a stylish paper napkin. Style the potpourri inside the basket, close the lid, and secure with a wide ribbon.
- make a sachet by placing potpourri inside a fabric bag. Tie the top together with ribbon or twine.

Closing Tidbits on How to Make Fall Potpourri with Dried Fruit
Creating your own fall potpourri using dried fruit is a simple and sustainable way to bring the scents of the season into your home. By following these steps and using immense creativity, you can customize potpourri to fit your personal preferences. Any which way you choose to make it, know that this handmade scent will add a touch of autumnal warmth to any room.
As we journey through fall, let us not forget the powerful shift that comes with slowing down. Be encouraged to pause, take a breath, and make something special with your own two hands, finding peace along the way.

Leave me a comment. Have you ever made potpourri before? Would you try this recipe? I love hearing from you!
Follow Along with The Antiqued Journey
Pinterest | Facebook | Instagram | LTK | Amazon
 Click the red button in the left corner to save it for later!
If you are new here, I’m Rachel, the writer and content creator here at The Antiqued Journey. I’m so happy to have you! I encourage you to stop by the ‘about me’ page to get to know me a little more.
Here on the blog, you will find loads of inspiration for decorating with vintage and antique decor, simple DIY crafts and many thrifting adventures. If that interests you, I invite you to sign up for my e-mail. You will receive a free digital download as a thank you!
Other Fall Posts to Enjoy


Feeling a little unsure where to start with vintage decor?
I created Found and Favored, a beginner-friendly guide that walks you through what to look for, how to spot quality pieces, and how to style vintage finds with confidence — without overspending or feeling overwhelmed.

Hey! I’m Rachel!
I’m so glad you are here! Old things are my jam. Antique malls and thrift stores are my happy places.
Here on the blog I love to share my excitement, knowledge, and ideas about all things antique, vintage, and thrifted. Let’s journey together!
Want to style vintage decor with confidence?
Get the beginner’s guide that will save you money and help you find real treasures.

Sign me up for the
Journey!
Sign up for free antique and vintage inspiration, DIY projects, and thrifting tips straight to your inbox.
14 Comments. Leave new
This is great Rachel! I can almost smell it through the computer. It looks beautiful too! 🍂💛 XO- MaryJo
Thank you!! It smells SO good…the perfect amount of spicy for the fall 🙂
My Mom and aunts used to buy big bags of potpourri each season and put them throughout the house so this post brings back the best memories. I’ve never tried to make my own and I know they haven’t either so they’re going to be tickled pink when I send them this post. Sending you hugs and thanks as always for the reminders to slow down and enjoy the season. It’s so important, CoCo
Hi!
That’s amazing!! It was honestly SO Fun…very relaxing, mixing scents and things together. Thanks, friend!
[…] past Thursday, I shared a brand new fall DIY on how to make potpourri with dried fruit. It smells SO good and is extremely easy to make. Check out the post for the full […]
Oh….I bet this smells absolutely amazing! Perfect for making the house feel cozy for fall!
Yes…Smells SO good!! Thanks, Jen!
Hi Rachel – I am sharing a link to this tutorial in my Christmas Tree decor post. I love how you used natural elements and dried the fruit!
Hi! Thanks so much, friend!
I love this idea, Rachel! It looks so pretty and I can imagine how wonderful it smells! I want to try drying fruit for Christmas decor this year, so thanks for the tips! Happy Fall!
Thank you!! It’s so much fun and the end result is very satisfying!
This looks so yummy Rachel! I know we are not supposed to eat it,lol…. I have dried oranges, but have never tried apples or pears. Thank you for the great tutorial. I can almost smell it!
Hey, Wendy! Thanks so much!! This was super fun to make 🙂
[…] If you are looking for a unique and delicious fall DIY, this potpourri with dried fruit may be just the thing! Follow along with this step by step tutorial on how to create your own potpourri using dried fruit. […]