


Last Updated on November 18, 2023 by Rachel Granholm
This DIY flower pots tutorial will walk you through creating flower pots using old jars!
Each spring I look forward to planting flowers and greenery around my outdoor patio space. There is just something peaceful about digging in the dirt and creating beautiful containers filled with plants, especially if they are your own DIY flower pots!
With a few simple materials and an afternoon, you can create an outdoor space that is beaming with beauty. Follow along and be inspired with this DIY flower pots tutorial.
Materials
- a drill with a masonry drill bit
- various sizes and colors of jars
- potting soil
- flowers and/or greenery that will grow well in your location
- garden trowel (optional)
- gardening gloves
Directions for DIY Flower Pots
1. Collect or gather jars in various colors and sizes.
I had these jars sitting unused in a cupboard, which was actually the inspiration behind this project, knowing I could do something neat with them!
I cleaned them up a bit with a rag and were then ready to be repurposed into pots!

Tip: To source jars, go through your house and look for some old ones you can use for this project. If you can’t find any in your house, check the thrift store. I guarantee you will find some amazing jars to use!
2. Drill drainage holes.
You will need to use a special drill bit for this to be able to drill through the ceramic. It’s called a masonry bit and can be found at any hardware or home improvement store. To achieve this step, turn your jar upside down.
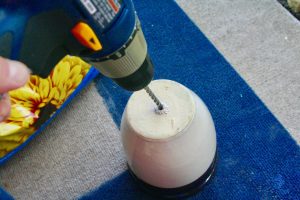
Tip: I suggest doing this on some type of softer surface, such as an outdoor rug or a thin towel. This will help to not scratch the rim of your jar while you are drilling.
With one hand firmly holding the jar and the other one drilling, start slowly and take your time. Stop often to check the hole and blow off excess dust. This step took me a good 15 minutes for one jar so patience is key here!
Tip: If your jar is on the larger side, I would suggest drilling 2, maybe 3 holes for adequate drainage.
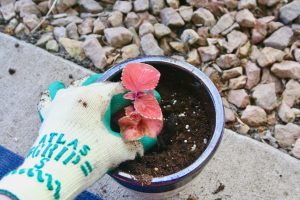
3. Fill your jars with soil and plants.
Fill your jars halfway with potting soil, arrange flowers or greenery, and then fill up the rest of the jar with soil.
Water them well!
4. Arrange your new pots!
You can choose to display your new flower pots in a way that is pleasing to you. I like to group smaller things together in 3’s, as shown here.
If you have a large jar, that might look nice placed by itself on a table or a plant stand.

Closing Tidbits
Plants add a simplistic beauty to your space, whether it be indoors or outdoors! They bring in that earthy texture from the soil, leaves, and petals, creating a peaceful ambience.
I hope you are encouraged to try this project. Your pretty jars will infuse color to your space and will be a special addition to your home.

Create more DIY projects here!
Let me know how your project turned out in the comments below. I would love to hear!


1 Comment. Leave new
Fun and simple project!