


Last Updated on November 16, 2023 by Mitch
Today I want to show you how to create a DIY winter wreath for post-holiday decor!
My house is back to its ‘normal’ now after taking all of the Christmas decor down. It feels so fresh and brimming with possibilities. Let’s make a DIY winter wreath!

For some, this time of the winter season is just a period of waiting for spring to arrive, but winter is a time to be celebrated! It has a beauty all its own with the sparkling snow and the peacefulness of walking in the snowy woods. My hope is that this winter wreath tutorial will help you celebrate winter in your home, so follow along and be inspired!
Materials Needed
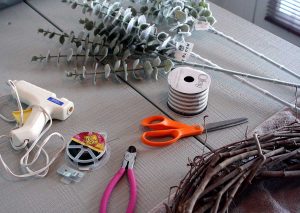
- 1 grapevine wreath
- 3 faux eucalyptus stems
- 1 spool of ribbon in a winter color (think grey, black, cream or navy)
- scissors
- floral cutters
- hot glue gun
- a workspace cover
Creating Your Wreath
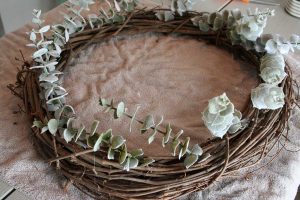
Step 1: Lay your wreath on a flat, covered surface.
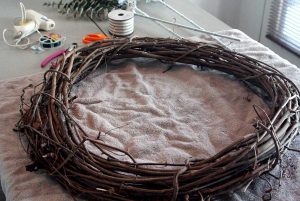
It will get a little messy with some of the wreath pieces coming off as you work and having an old sheet or towel down will also protect the surface from the hot glue.
Step 2: Cut the eucalyptus branches off of the long stem.
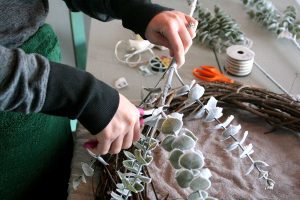
Using the floral cutters, snip each branch of eucalyptus off at the base and set aside. This would also be a good time to plug in the hot glue gun and let it heat up.
Step 3: Arrange the eucalyptus branches on the wreath.
This is your wreath, so arrange the stems in a way that is aesthetically pleasing to you. Play around with them until you get what you like before gluing.
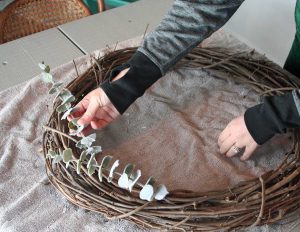
Step 4: Glue.

Using the hot glue gun, squeeze a good amount of glue at the end of each stem. Be sure that the glue is adhering to both the stem and the wreath so that it stays in place. It is helpful to apply a little pressure with your finger for about a minute after gluing to be sure the stem is staying in place. Repeat these steps until you have each stem glued.
Step 5: Let the glue dry.
Let the hot glue dry for about 30 minutes before continuing.
Step 6: Wrap your ribbon.
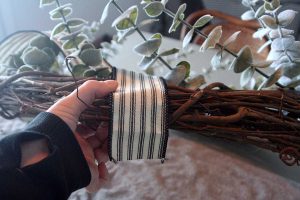
Find the spot on your wreath that you want to start the ribbon. Once you do that, turn the wreath over and place a line of hot glue about a quarter of the way down from the top to adhere the beginning of the ribbon. Hold the ribbon in place with firm pressure for one minute. Leaving the ribbon on the spool, start wrapping the ribbon around the wreath. Again, this is your wreath so wrap the ribbon in a way that makes sense to you. Tip: I wrapped the ribbon every 2 eucalyptus stems around the whole wreath. So it was 1 ribbon wrap, skip 2 stems, wrap again, etc…When you get to the spot where you started your wrap, cut the excess ribbon and adhere the ribbon to the back of wreath with another line of hot glue.
Step 7: Let it sit.

Step back and look at your wreath. If you need to bend some branches or maybe flatten some of them or adjust the ribbon, this is a good time to do that. Pull off any hot glue strings that may be lurking in the branches.
Step 8: Display your wreath!
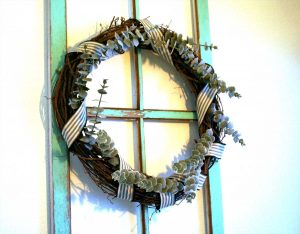
You have created a pretty winter wreath that is unique to you and now you can proudly display it in your home.
Here are some ideas of places to hang it:
- over a kitchen window
- on your front door
- hang the wreath on an old, chippy window frame and then hang the window on a large wall
- in the entryway
- over a mantel
There you have it! This DIY winter wreath is simple and inexpensive yet adds a beautiful, wintry texture to your home for this season. The beauty about this wreath is that it can be interchangeable for the seasons. It is easy to remove the winter ribbon and glue a different one on for spring. You can easily add in some faux spring floral stems as well. My hope is that this encourages you to slow down for a little while, take some time to create, and enjoy the beauty of winter!

If you want another winter project idea, check out my post on DIY soy wax candles!
Find Antique and Vintage Inspiration.
Go shopping in The Antiqued Journey shop!
If you are loving my content, please consider subscribing to my e-mail list. In return, you will receive a free digital download and weekly inspiration delivered to your inbox. I would love for you to be a part of The Antiqued Journey community!
Shop My Post


3 Comments. Leave new
Love it! Simple yet beautiful!
Simple and primitive, love it!
[…] DIY Winter Wreath […]